
Using Live Edge: Building a River Table
 Selecting the Right Slab
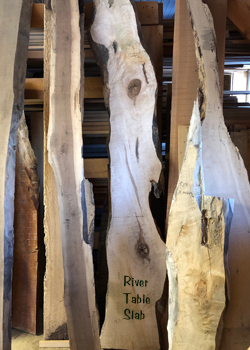
Live Edge slabs are increasingly popular, and why not? Each is unique and carries its own inherent beauty. Many people tend to look for a relatively uniform slab: They’re looking for a somewhat even-edged desk or bar top. But others will look for the most gnarly slab in the store.
Such is the case with Jay Seaton who recently came in shopping for a slab suitable to build a river table. He pulled out several contenders, as shown, and picked the one that had the most uneven edges. It had interesting sworls , bumps, and bulges all along its edges. There was nothing the least bit “uniform” about this piece: it was perfect!
Allowing for Wood Movement
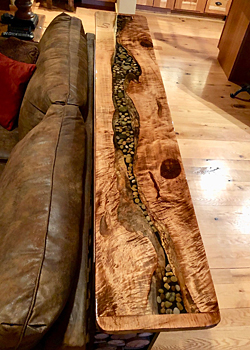
 Once he had the piece home, he sliced it longitudinally to create 2 smooth edges. He then constructed end caps so the two uneven edges faced each other, forming the “banks” of the river. Once the pieces were “framed” this way, they formed a perfectly sized bar top.
Wood will expand and contract with the seasons. When finishing wood, it’s important to seal all edges, faces, and ends. The better the sealing, the less the movement, but the wood will still move – even when you seal with epoxy! The wider the piece of wood, the greater the amount of seasonal movement.
With wide boards like slabs, wood movement must be considered if end caps or underside cleats are installed. The grain of these cross grain pieces will resist the seasonal movement causing cracking. Cleats often use slotted screw holes to allow for movement and end caps (or breadboard ends) have special mortises to handle the movement.
Fine Woodworking has a good article in its April 2019 Issue #274. The article, “Learn your M&T’s” is also available online as “11 Mortise and Tenon Variations.” Crenelated tenons, as shown in the article, will allow for wood movement and keep your table top flat through the seasons. In Jay’s particular case, cutting the slab down the middle reduced the amount of seasonal change in half and thus the movement became negligible.
Applying Finish and Epoxy
 Once the basic structure of the table is built and sanded, the surface needs to be totally dust and dirt free. The edge of live edge, since it is the actual outside of the log which lay in a mill yard, may have dirt on it. Wire brushing should remove the dirt. Once all loose particles are removed, wipe all the surfaces with a soft cloth dampened with paint thinner. This will ensure you have a completely clean surface. You can then apply any stain you’d like. Jay used the stain to bring out the figure in his maple slab.
Jay elected to make his “river” clear instead of colored. He suspended stones in the layers of epoxy taking care to eliminate any bubbles. Air introduced into the epoxy from the mixing, or from the wood itself, can cause air bubbles to form beneath the surface. Eliminating air bubbles can be tricky when working with epoxy. West System Epoxyworks has published an article entitled “Casting Epoxy” which can give you some pointers both on reducing the amount of bubbles and removing any bubbles that have formed. It’s important to pour the epoxy in several thin layers to avoid having it overheat and crack.
Once the “river” was filled, the entire top was finished with a clear epoxy. Once again, West System Epoxyworks has published an article to give you a hand. “Pouring 105/207 Epoxy on a Bar Top ” will give you some instruction on keeping the epoxy smooth and even, as Jay did on his table.
If you’d like to use a finish other than epoxy on your table, West System will bond with several products. Using a UV-stable finish over the epoxy and the wood will keep your epoxy clear and bright for a longer period of time. For the toughest finish, use a two-part polyurethane. It will have the most resistance to scratches and dents. You can also use one-part polyurethane, but make sure it is UV stable. If you like traditional finishes, varnish is an option. In order to get a UV stable varnish, you will most likely be purchasing an exterior finish.
If opting for one of these finishes, it’s important to note that any “pour over” of the epoxy on the table surface will be visible beneath the finish. Once the epoxy has completely cured, you would need to sand away any epoxy showing on the surface of the wood (outside the “banks” of your river. ) Deep sanding will disturb any stain you’ve used on the surface, so consideration must be made in what order you would apply the stain, or if you would elect to use a stain.
Finishing Touches
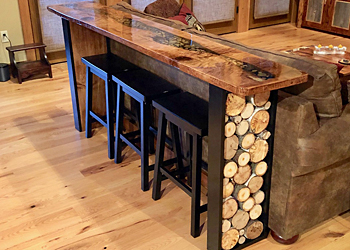
Jay completed his project with very creative supports for his bar top. The rustic log ends perfectly complement the decor of the room. The entire piece creates a beautiful focal point.
Thank you, Jay, for sharing your inspiring project with us. It is incredibly gorgeous and a true work of art.
Materials to Build a River Table
Goosebay stocks the following products:
Live Edge Slabs in a variety of sizes and species
West System Epoxy 105 Resin and 207 Clear Hardener
Updated October 30, 2019